|
Here's the set, pretty much out of box. Shinobu and Inaba enjoy drinks by candlelight, with a silver 'iPod'
providing music from the 'docking speakers'. Meanwhile, their son Michio loves snacks and burgers, and his R2D2 (sold separately)
is never far away. The green and purple thingie is a light-up toy, but in my little diorama, it's a patio heater.
It's a really nice set. Retails for about $20., comes with a blonde doll (donated !) and drinks, food, and
a few props - tongs, an ice bucket with lid, a cardboard box of ice cream, the 'iPod' and speakers, ketchup and mustard, a
candle on a dish, four tropical drinks (two pink, two green), a pink 'bag' of chips, a plate with a burger affixed to it,
and another plate with...some sort of food, I haven't identified what it's supposed to be yet. The sink part of the grill
has spigots that turn, and it even lifts out for extra storage. The chicken on the spit is brown on one side, pale on the
other, so you can position it for fun. And it's easily removed. Unfortunately, the burgers and hot dogs under the chicken
are permanently attached to the grill, even though they're shown separately in the included leaflet.
I swear, though, the grill looked more burgundy in the store. Once I took that photo, I came to the realization
that it'd just have to be painted, no two ways about it. Too pink !
| Your shopping list ! |

|
I've painted some stuff before, so I'm gonna jump right in. If you're new at prop painting, you may wanna
snag some cheap, meaningless-to-you furniture from yard sales or thrift stores to practice on first. That way, you've developed
'the touch' without potentially wrecking stuff you love.
Here's what you'll need :
The pieces you're gonna paint
Fusion paint for plastics, by Krylon, in your favorite color and texture
A small bottle of paint thinner or mineral spirits
A rag or two
A tarp or old clothes to paint on (newspapers will do if you don't have fabric)
Optional :
Masking Tape
About 14 inches of yarn or string.
For painting plastics, nothing beats Fusion. It's more expensive than regular spray paint, but if you follow
the directions, it won't chip or flake on you, ever.
Masking tape is, of course, for shielding the parts you don't want painted. It's designed to adhere
well, but peel up cleanly, and you can find it most anywhere. It's also called 'painter's tape'. Depending on the project,
you may not need it.
The string is my idea. Y'see, I wanna get up-close to the stuff I paint. Which is a bad idea. Get too close,
the paint gets applied too thickly and runs. Or it takes forever to dry. So I tie a string under the spray button, measure
it off (Krylon recommends an 8 to 12 inch distance), cut it, and let it dangle as I spray. If the string touches the item
or surface, I know to back off.
First thing to do is to read your can of Fusion. You need good ventilation - outdoors is best - in low humidity, with
the ambient temperature between 50 and 85 degrees F. If your prop is new, you'll need to give it a quick wipe-down with the
paint thinner, on your rag. This gets it nice and clean for the paint, and helps it stick better.
| It always amazes me, how easily it comes apart ! |

|
Now then. Time to tape stuff up, and take stuff apart. The legs to the table
and benches click in, so that was easy. The grill's silver door handles, condiment tray, grill hood, and sink come off
easily. So the whole grill will get a good coat, inside and out, the doors were removed, too.
Only thing that wouldn't come off is the silver part of the grill. And since
I want that to remain silver, it's time for the painter's tape. Wrap it up good, and make sure pieces overlap, because the
slightest gap will allow paint inside. Don't worry about a bit here or there - the paint thinner will clean it right off,
but you wanna avoid it if possible. Here's my mummified grill, ready for paint !
| When you have to tape off, you use yards of it ! |

|
Wind picked up, so I had to take my project inside. Opened up the doors
and windows - remember that you need plenty of fresh air if you're indoors on this project. I'm using a painter's tarp to
paint on - you may wanna use newspaper or scrap fabric.
Any spray paint works best when you're applying several thin coats. Dries
faster, and doesn't run. Shake your Fusion for two minutes, then paint in a sweeping motion back and forth, making sure to
keep that important 8 to 12 inch distance. End each sweep off the side. Fusion dries fast - about 15 minutes or so - then
flip it to paint the other side. If you need to do several coats, do so within four hours, or you'll have to wait 24 hours.
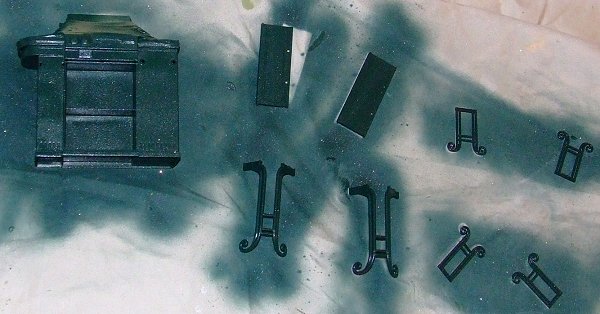
| The white spots are texturing - I forgot this |

|
| Fusion paint had shiny bits in it ! |
Here's mine, waiting to dry. It's up for handling within an hour of your last application, and fully chip
resistant after 7 days. I've done some doll shoes and other furniture before, and it really does honor its promises. Only
times it's ever screwed up on me is when I didn't follow the directions !
Here's a final cheat tip you probably shouldn't take. On just about any project, there's this one spot,
tiny but glaring to you, that didn't get painted. I've been known to spray the paint right onto an inexpensive paintbrush
- like what kids use with paint-with-water books - and brush the paint on, very, very carefully. It's better, of course, to
get it when the rest gets painted, mask parts off carefully, etc. But sometimes, ya just gotta cheat a bit.
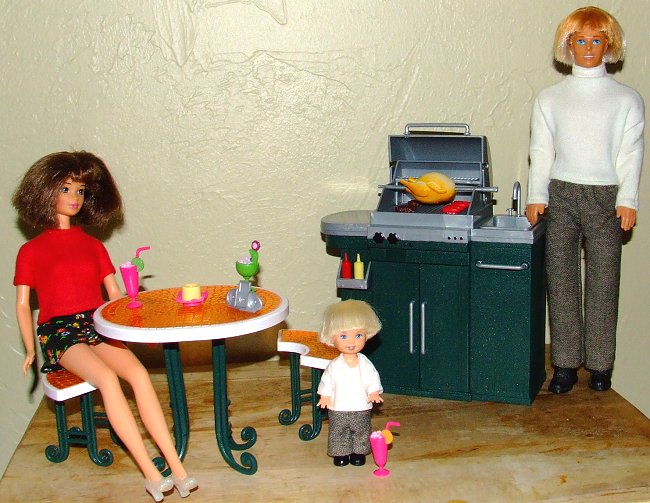
And, here's the final version :
| Ahhh...a nice day on the patio ! |

|
| Don't need the heater anymore ! |
Much better ! I just did a coat on each side, then touch-up when pink was showing through. I also got some
Testor's model paint for the dials. Or you could use a Sharpie or Magic Marker. I'm gonna be gentle with it until the
week's up and it's fully bonded. But I really like how it turned out.
For the curious, I used 'Decorator's Touch Textured Shimmer' in dark green on this one. I like how the orange
table top and green legs look together. Plus, orange is Beloved Hubby's favorite color, and green is mine !
|

