|
One quick note - I made the blue sock-top twice, to get the best photos. So things may look a bit different from image to
image. Procedure, however, is the same. Thanks !
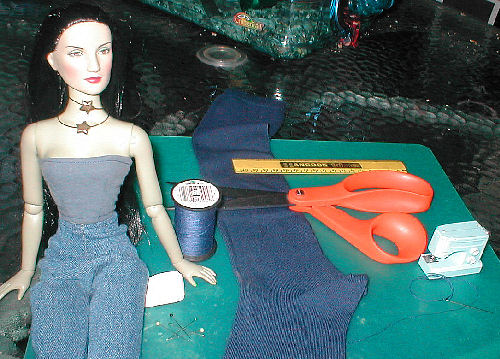
-Your doll, for fittings (thanks Elphaba !)
-A sewing machine (full size !) or hand-sewing needle.
-A stretchy sock that measures at least five inches above the heel - or a five-inch long tube sock.
-Thread to match - or contrast !
-A ruler
-A few pins
-Some interfacing or stabilizer (thin paper or a used dryer softener sheet will work).
-Scissors
-A pen, pencil, or something else to mark your fabric so you can see it. For this example, I'm using blackboard chalk,
the white lump by Elphie's hand.
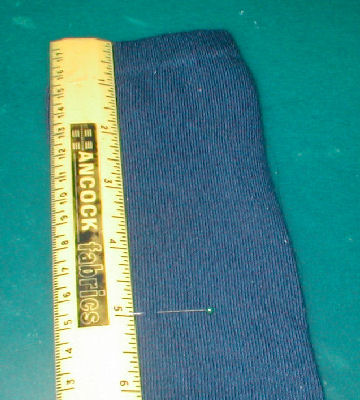
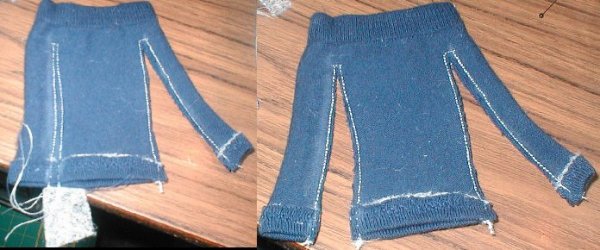
Ready ? OK ! To save time and sewing, we're gonna use the top of the sock as the neckline, and cut five inches down from
there.
| Soon - the five inch tube ! |
|
|
You now have a five inch tube. Decision time.
The original directions didn't hem this. The author advised just turning under the raw edge on the bottom and cuffs. It
does make things easier, but a hem won't take long, and will make your blouse/sweater much more durable - it won't pick or
run. If you don't want to hem this, skip down to the sleeves part.
If you'd like to hem, there's a few things you should know. Since we're using a stretchy sock, you'll need a stabilizer.
That keeps the 'fabric' from stretching out of shape while you're sewing it. In my photos, you'll see a used dryer softener
sheet. Cheap stabilizer. Thin paper, or interfacing scraps work well - anything that's thin and can either be cut or torn
away once the stitching's in place will be fine.
| When you hem the bottom... |
|
|
| you're also hemming the sleeves ! Coool ! |
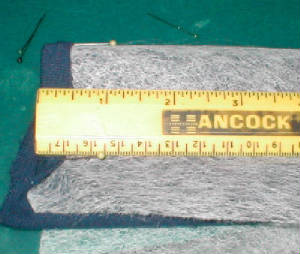
Turn your five-inch tube inside out. Grab your stabilizer of choice and the ruler and a few straight pins. Our hem's gonna
be about a half to 3/4 of an inch deep. Actually, whichever hem size you're comfortable with, at an inch or less, should work.
Here, I'm using about a half inch. Fold over the size you choose to face you, and tuck the start of your stabilizer within
the fold.
If you're more comfortable aligning your stabilizer with the raw, cut edge and folding it over that way, it's fine. But
for this project, a single layer of stabilizer is plenty.
Pin it down, then measure and tuck the stabilizer in all the way around. You definitely want it to be consistent !
| Stabilizer and hem all pinned and ready - |
|
|
| Rev up your needle ! |
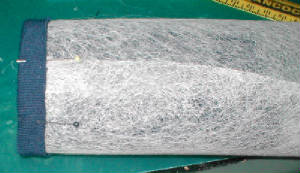
Here's one pinned up and ready to go. Don't worry about the stabilizer being so big, we'll cut it after we're done.
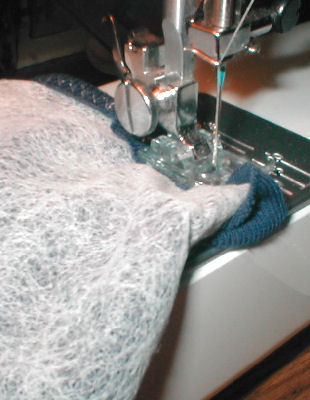
| Here's some stretch stitching ! |
|
|
I realize not everyone has - or even wants - a sewing machine. But it makes this project go sooo fast ! To be honest, I haven't
tried this for hand-sewing, but I'd assume it's much the same procedure.
Most of today's machines have stretch-stitches built in. If you haven't tried yours yet, you may want to practice a bit.
It's a bit of doing to master 'the touch' when it comes to stretchy knits - feeding it through firmly so it won't go to the
feed dogs, but not pulling so the stitches are off and the seam's lumpy. So you may want to practice a bit, or have lots of
socks handy. Heck, I learned my perfect 'touch' doing these sock blouses ! :)
You're gonna sew all the way around. Go slow and carefully. If you're hand-sewing, make sure to leave some 'give' in your
stitching, as it's gonna have to stretch to go on the doll. Either way, keep your stitches even and steady - it's not like
this'll take long !
Overlap a bit in the back, and cut your threads.
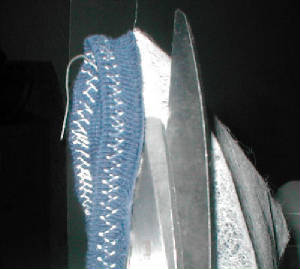
| Here's where we cut away the stabilizer... |
|
|
| the hardest part's over ! |
Here, I did a feather-stitch stretch-stitch hem in white. So you can see it better. Cut or tear away your stabilizer - I like
to cut mine close to the stitches, but leave the fabric alone. Some like to cut the fabric and stabilizer close to the stitches.
Your call !
Folks who aren't hemming - you can come back now ! :)
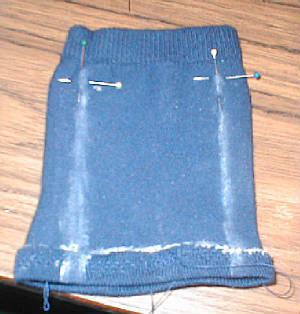
| Grab your pens and pins - it's marking time ! |
|
|
Ok. Grab your ruler, too - time to mark off the sleeves. I'm using chalk so you can see it, but it fades fast. Gel pens are
often light enough to see, and work well for this. I lost my favorite silver one, though. And can't find my regular Dritz
fabric markers.
You're gonna mark an intersection one inch down from the top, and a half-inch over from the sides. Draw a line from that
mark all the way to the bottom edge, making sure it's always a half inch over from the sides. You can mark it one side at
a time, or both at once, your choice.
If you want to, you can draw a second line about a quarter-inch in from this one. It'll form a 'V', with the point at
the inch-down, half-inch-from-sides mark. Or you can draw the first line, then stitch it freehand instead of drawing it.
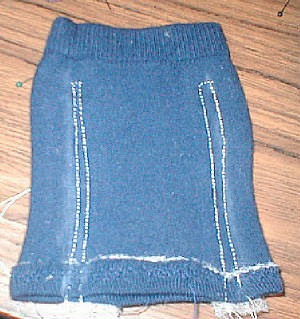
| When the photo says more than a hundred words... |
|
|
| of my over-stated, over-long directions. |
As you can see, you stitch up the lines you just drew, maybe take a stitch or two over, then go down pretty close to it. I
like to tuck a strip of interfacing behind the line, but you often don't need it. It'll be fine, as long as your stitching
lines aren't too close, and don't intersect - you're gonna cut into it.
And, you can see, one sleeve is bigger than the other. (sigh) My last three were just perfect, but I screwed up both tops
I made for this page. But as long as your sleeve stitch lines are parallel and only intersect at the top, close is often 'close
enough'. You'll see.
Knot the threads at the bottoms, so they won't pull out later. Again, if you're hand-sewing, make sure there's some give,
but here, a simple straight stitch is fine. Won't need stretch stitches here unless you want practice.
| We are sooooo almost done ! |
|
|
After you've knotted your threads, time to cut. Go slow and careful - you don't want to cut into anything and have to resew.
It may help you to sew this part in contrasting thread, since it'll only show if the sleeves are too tight.
Cut both sides, and you have an inside-out doll sweater or shirt. Wanna see how it looks on Elphie ? Carefully turn yours
right side out - you may want to use a gentle pencil (eraser end) to help turn the sleeves - and eeeeease it on your doll.
Take note for next time of tight sleeves (more later), tears, etc. This first try may not be perfect, but it usually fits
!
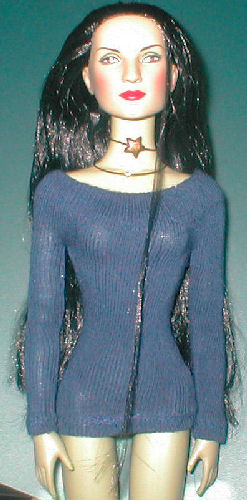
| Here's Elphie's new sweater ! |
|
|
Not bad, huh ? Even with that one sleeve being too narrow, it still fit, and looks darn good on our Elphie ! And if it can
look this good with all my mistakes, imagine how good yours will look after a couple of trials !
And even if that sleeve hadn't worked, I wouldn't have trashed it. Simply extend the stitches up through the collar, and
she'd have a cool one-sleeve asymetrical sweater instead ! Or a short-sleeved one. There's lots of variations you can make
with minor adjustments - and you probably have a whole 'nother sock to work with ! Same principle can work for skirts, slacks,
capes...there's a lot of doll clothes for you to make and own out there. It's just odd that right now, they're socks !
You can probably also get this to fit other dolls with minor changes, too. I made two blouses from a single kids' sock
for my Barbie dolls - maybe baby socks can work with dolls even smaller !
And let's face it, if I can do this, you can, too ! Go check out some pretty socks at your favorite stores...or the solo
socks somewhere in your house that are too nice to toss.
I now charge you to go make some doll clothes ! Enjoy !
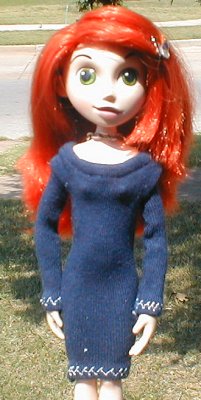
| The 'white feather-stretch-stitch' one that |
|
|
| 'didn't work' fits Kim Possible great ! |
Quick added note - The 'white feather stitching' sweater I made for this page first, I completely messed up. Stitches aren't
even, got a measurement wrong, no way it'd EVER fit Elphie ! And it isn't my best work, fer sure. Guess I was too excited.
While cleaning up, I found it again, figured it was too tight even for Barbie...but Kim Possible hadn't gotten new clothes
in over a year ! And it fit !
This is actually my Beloved Hubby's Kim Possible doll -a cute 9 1/2" mascot for his car. Won't he be surprised !
:)
|