|
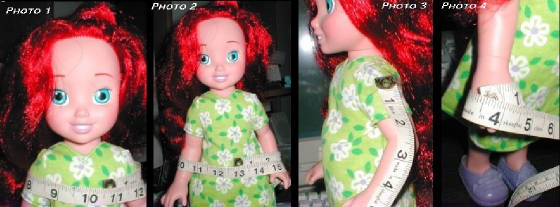
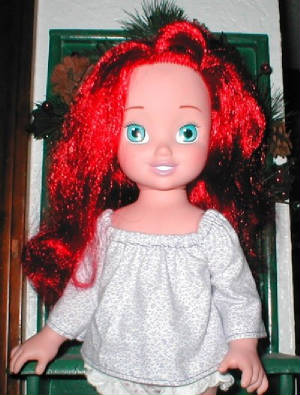
In Photo #1, her shoulders measure about 10.5" around.
In Photo #2, her waist including her arms is 14" around.
In Photo #3, her arm length, starting from where I measured her shoulders earlier, is about 4", including her slightly
bent elbow.
In Photo #4, the widest part of her hand is about 3 and 3/4" around. You may also want to measure her upper arm,
just in case. I have two dolls that have larger upper arms (where the arm meets the torso) than splayed hands - you'd think
the hand and outstretched fingers would be larger ! Use the larger of these two measurements if they're different.
Also measure her from shoulder to 'armpit'. This'll determine how far down from the top the sleeve stitching will go.
This is how we're gonna figure how much fabric to cut. First, we double her shoulder measurement. 10.5 x 2 = 21 inches
long.
We'll be cutting two sleeves about 3 and 3/4 inches wide from that, which comes to about 7.5 inches. I'm rounding it to
8 1/4 inches to allow for the seam. Will there be enough
fabric to go over her waist ? 21" - 8" = 13". Her waist is 9.5 inches, so that should be enough.
So far, we need a piece of fabric 21 inches long. Her arms measure at 4 inches long, but we need to add a half-inch bottom
hem and a half-inch top casing. So the fabric needs to be five inches wide (4" + .5" + .5" = 5").
Of course, this is just an example - but it shows how to do this for your beloved doll !
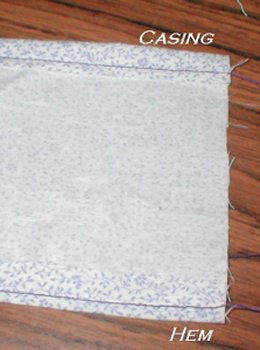
Cut fabric according to what you've determined you need. In my case, I need a strip 21 inches long and 5 inches wide.
Measure out a half inch hem at the bottom all the way across, pin and sew. Do the same thing to the top, to make the casing
for your elastic.
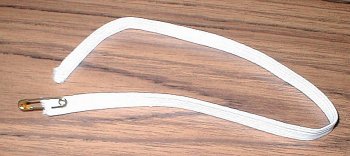
Elastic time ! I have tons of 1/4" wide elastic, so that's what I'm using here. If you'd like to use wider stuff, adjust
your measurements accordingly.
Since her shoulders measured a little under 10.5", I'm going to use slightly less elastic. I tested 9 inches of unstretched
elastic, made sure it stretched over Ariel's
waist and arms and head easily, before I cut it.
Attach a safety pin to one end of the elastic and thread it through the casing. When the other end reaches the start of
the casing, pin it down, and thread through to the other side.

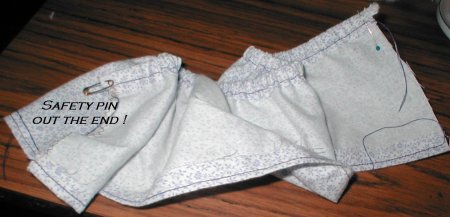
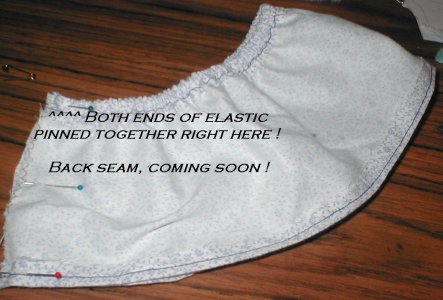
Take off the safety pin, and pin this end down, too. Arrange the gathers evenly.
If you like, you can hand-tack the elastic down, or you can fold your strip right sides together, lining up the casing
and hem. Make sure the elastic is flat within the casing. Sometimes it can twist during the feed-through.
Sew the back seam all the way up, from the hem to the elastic. You may want to reinforce the elastic with a few extra
stitches.
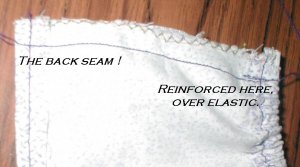
We're nearly done ! Now then, tie off the thread ends of the back seam and cut.
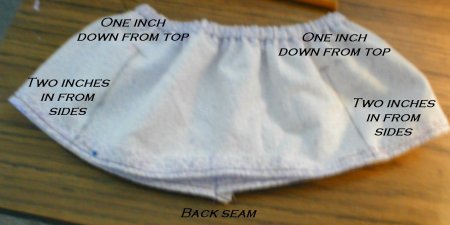
Time to do sleeves ! Leave it wrong side out, but this time, center the back seam at the back and lay it down flat. Time
to mark sleeves. Since Ariel's hand is nearly four inches in diameter, we're gonna mark two inches in from the sides, and
about an inch down from the top.
Sew. I like to use a narrow 'U' shape, but you're welcome to square it off or use whatever shape makes you most comfortable.
Just make sure you've got good measurements and stay within 'em.
I stitch right on the line I just drew, then make a couple stitches over and come down. You're gonna cut between these
stitch rows, so don't make them too close together, or you'll have to resew because the thread didn't have enough fabric to
'grip'. So far, I've found that, no matter what material I used, about a half an inch between the two lines is good...about
the width of the zig-zag presser foot normally in my sewing machine !
I like to use a contrasting thread for this, since it makes it easier to see where you're gonna cut soon - and it's in
the inside and won't show anyway. Tie off your thread ends, and grab the scissors.
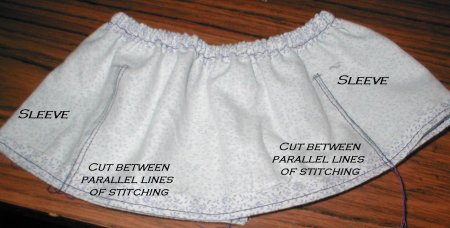
Carefully cut the sleeves from the bodice.
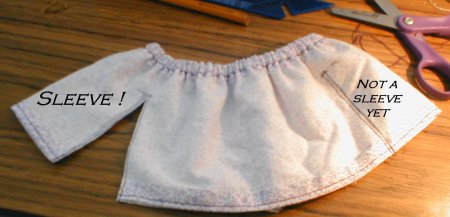
All right ! Turn it right side out and give it a try. If all the measurements are right, it should fit great ! And that's
one easy peasant blouse !
| I'm glad this worked out, but... |
|
|
| can I PLEASE have some pants ?! Freezin' my fins off here... |
If it's snug on the waist, you may want to pick a few stitches and turn the fabric in to make cool side slits. Or you may
want to tighten the elastic a bit - easy to do, you just have to pick a few stitches from the back seam where the ends are,
stretch and snip, then resew.
Next time, you may want to pick a few stitches at the sleeve seams and slide elastic into the cuffs. You can use more
fabric for fuller sleeves, or a bit less for a more snug fit, and have lots of fun decorating them !
Using the same idea, you can make a jacket by folding the ends in and hemming instead of sewing them as the back seam.
Add closures to the hem, and instant jacket !
You can shorten the sleeves, make the bodice part longer to make a dress or nightie. You could even try shorts or pants
using the same elastic-top tube, by measuring the waist and hips, leg length and rise (distance from waist to center crotch),
and sew in legs like you sewed in sleeves.
The possibilities are endless - especially for those dolls that had no patterns made for them, or for those hard-to-fit
ones. If something isn't clear or you have questions, feel free to contact me at dollsewist@hotmail.com.
Of course, I'd love to see what you make of all this ! :)
| Late Night Addendum : |
|
|
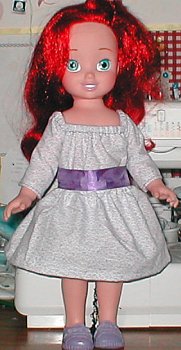
| I made a matching skirt and belt ! |
Just for fun, I made a simple skirt to match. It's about the same as the blouse - twice the waist measurement, elastic to
fit waist and stretch over the hips. Hem and casing, string elastic through, back seam, done.
It really needed more, so I made a ribbon belt - basically a length of ribbon hemmed at the ends with Velcro added. Now
Ariel has a pretty dress !
And about eight more dolls want peasant blouses......
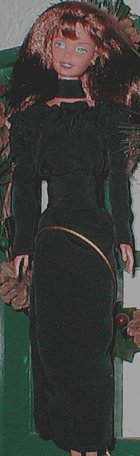
| Casey's ready for a Christmas party ! |
|
|
| And so is Gracie ! |
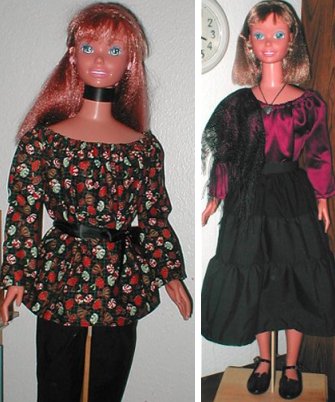
With a blouse this easy to make, lots of dolls can get new clothes fast ! Each blouse took about an hour, but I bet a kid
could wear them easily. If you haven't yet met 'Casey' and 'Gracie', they're My Size Barbies, customized by Beloved Hubby
and me. They're also featured on their own page - feel free to give them a visit !
I wanted a full blouse for redhead Casey's busy Christmas candy print, so I used 2 1/2 times her shoulder measurement.
Sleeves were a bit long, so I had to re-hem them, not a problem. Her slacks are from Doll Shop Deluxe, a doll pattern program
also reviewed elsewhere on this site. Belt is a simple ribbon, and all stands are Hubby-made.
Brunette Gracie goes for a sort of neo-gypsy (Stevie Nicks ?) look in her satin peasant blouse, teamed with a tiered skirt
from Doll Shop Deluxe and a lace shawl from Dollar Tree. Her blouse uses about ten inches less fabric than Casey's, as I wasn't
sure how the thicker fabric would drape, and didn't want too much bulk. Her blouse is also a bit shorter, as I wanted to tuck
it in.
Same construction, similar measurements, about the same blouse, but two entirely different looks ! Amazing how much of
a difference fabric drape and weight make.
I wonder who'll get a peasant blouse next ?
| Wonder no longer ! |
|
|
| It's Beautiful Crissy in a peasant dress ! |
Another day, another experimental peasant blouse ! Only this isn't a blouse, it's a knee-length dress - aaaand it's made of
two layers ! Last time I tried working with layers was a disaster...
If there was a mass-market doll created to wear peasant clothes, it's vintage 70s Crissy. Her first-year issue dress is
actually quite similar to this, but hers was orange lace over a darker orange cotton fabric, and was about two inches shorter.
This was made much the same way as all the others, but the bottom hems were sewn separately, so they'd lie flat together.
It's sheer luck that they match so well, and look like a single hem. To be honest, I was kind of hoping the lace would extend
past the striped fabric hem, but it's not bad at all the way it is ! Her sleeves were cut and hand-hemmed after the rest of
the dress was sewn. You can see the parts I cut off - they're a hair bow and purse in her left hand ! I like to use *all*
the buffalo.
The lace helps to tone down some truly bright fabric. Both pieces were remnants, one from W-M, the other from a yard sale
grab-bag. I was very lucky there was enough lace to use !
Who's next ? Or should that be 'what's next' ? Hmmmm.....
| You knew it was just a matter of time... |
|
|
| before Elphie got hers ! |
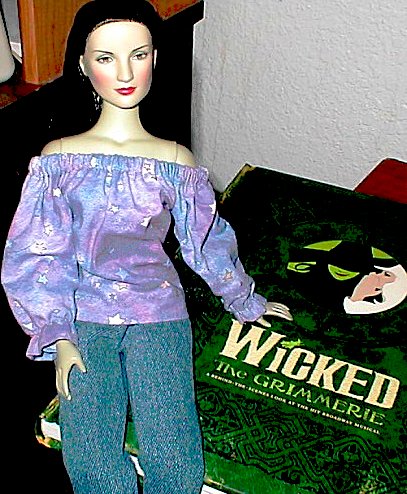
And here it is - Elphaba's peasant blouse. You knew I'd make her one eventually...
I try to do a little something different with each one. Tunics, bell sleeves, layers...now elastic ruffled wrists ! This
was a real PITA, but it looks quite good on her ! Ended up sewing to the top and across, then leaving the entire sleeve seam
open, then sewing stretched elastic in, and then sewing the sleeve seam. Ended up doing those seams several times, because
the sleeves were too puffy. Yes, believe it or not, they used to be *bigger* !
I may do something similar with the next one...
| You can even make it quite elegant ! |
|
|
| Of course, it helps to start with a lovely doll... |
Sorry this photo isn't the greatest ! It's another peasant dress, this time using black peachskin fabric (from a wrecked pair
of pants MIL gave me, knowing I'd reuse it eventually !). This time, a slinky evening gown gets added appeal from a top ruffle
above the elastic. To get it, ya just add a line of stitching above the casing line, tall enough for the elastic. In essence,
the elastic goes between the two lines. When the elastic is drawn tight, it ruffles becomingly.
Like with the Beautiful Crissy dress, I had to cut and hem sleeves by hand. And I used the sleeve cutaway as the belt
(Velcro closure in the back) and her neck accent. One more buffalo not goin' to waste ! The gold swirl around her is a stand
- but if I wanted to embroider this, it would look quite elegant !
That leaves me with only two major doll sizes to sew for. And I've been thinking of making a pirate shirt for Fiyero...
| Just when you thought you'd seen it all... |
|
|
| ...there's a hard-to-see new photo ! |
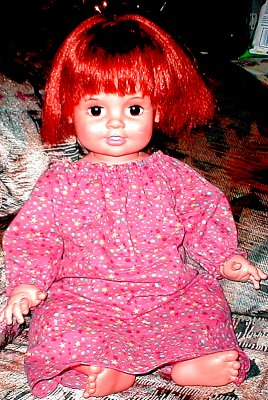
Here's the latest - a sweet little nightgown for my Baby Chrissy ! She's really a Baby Crissy, but I like to add the 'h' for
sentimental reasons !
This fabric was purchased eons ago, back when I looked for small prints over quality textiles. So I only paid a buck for
it, but it's still crap fabric. At least it makes a cute nightgown for Baby !
The collar and cuffs are ruffled above the elastic casings, like the Barbie dress neckline above. It's about as hard to
see in both photos ! The cutaway sleeves for Chrissy's nightie will probably make booties for her, but I'll have to get to
that later.
Which leaves only Timey Tell/Hi Dottie to sew for. Tomorrow's gonna be pretty ambitious, so wish me luck !
| The very last peasant - garment ! |
|
|
| I don't even know how much elastic this one took... |
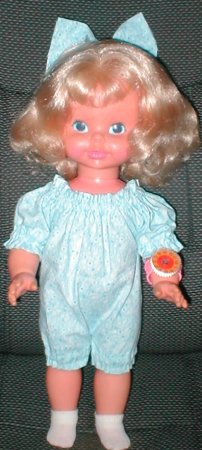
Aaand here she is, wearing the very last of the peasant garments - Timey Tell's got a new romper !
If you're unfamiliar with this style, it was quite popular amongst smaller kids when I was one. It's all one piece, and
this one has no closures - like all the rest on this page, it simply pulls on. It's a lot like the peasant dresses, I just
added a set of leg seams.
Since I wasn't quite sure how this would work, I ended up picking apart a lot of seams to insert elastic in the casings
I'd sewn, but even so, the whole thing took less than two hours. The collar, cuffs, and legs all have ruffles above elastic
casings, although it's a bit hard to see in the photo !
I had to make large sleeves to get around Timey's non-removeable watch, but I'd forgotten how big her knees are, so there's
not much ruffle there. Next time, I'll add 2.5 times her shoulder measurement, instead of just twice the measurement ! For
Timey and Dottie, you have to make sure the finished item covers up the speaker holes in their chests, too.
On the whole, though, I'm happy with it. And, of course, the bow in her hair was the cutaway pieces. For some reason,
I really get a kick out of doing that !
|